
Making Your Stay Enjoyable
Welcome to Cider Mountain!
We’re so happy you’re here and want to ensure your stay is wonderful. Below you’ll find general information including wifi, door/gate codes, check-out procedures, and room-specific info for the Suites, Lodge, and Cabins and a What To Do If… section.
Be sure to check out the “All Things Outdoors” section for venue-related information and you can learn about fun things to do around the area when you click on the Digital Guide Book button below.
Important Numbers
If you have questions not answered here, or if an emergency arises, please call one of the numbers below!
For bridal venue questions, call Chelsea: (208) 561-1101
For stereo equipment, thermostat, water, yard, utilities, gates or codes call Chris: (208) 691-7018
For kitchen, supplies, checking out, and all other questions, call Corrie: (208) 691-7111
Enjoy Your Stay!
General Information
-
WiFi
Network Name: CiderGuest
Password: Welcome2
Enjoying the seclusion and beauty of Cider Mountain has its benefits… but super fast internet isn’t one!
We have Starlink, but just a heads up—it can be slow at times depending on the number of people accessing it.
-
Household Products / Consumables
For your ease and convenience, we’ve provided some regular household items for your use during your stay. Things like paper towels, shampoo, toilet paper and laundry soap are checked and stocked prior to your stay. You should have plenty for the weekend, but if you run out or can’t find the extras, please give us a call!
-
Door and Gate Codes
For your convenience, your suite door code is programmed with the last 4 digits of the primary’s phone number or the phone number he or she chose. This same code allows you access to all entry doors and gates to the property.
Please share this with your children and guests — All doors and gates lock after closing so be sure to remember it or write it down in a safe place!
If you’d prefer to have the main building’s entry doors remain unlocked during your stay or event, we can do that for you! Please ask Chris: (208)691-7018
-
Check-Out Procedures
We hope to make check-out as simple and painless as possible. We have just a few requests:
Make sure dishes have been washed.
Bring your towels to the laundry room; leave them in a pile on the floor.
Take out trash to the dumpster.
Restore outside areas to the way you found them. This includes:
Pick up lawn games, toys, balls, etc. and put away.
Return borrowed decor items to the decor room.
Pick up/throw away signs, balloons, litter, etc. along Cider Rd.
Report any accidents (including biohazards like vomit) or damages. See the “What to do if…” section for more info.
Text Corrie or Chris when you leave.
That’s All! Thanks in advance!
Late Check-Out
A late check-out is already included in the weekend wedding package! For other events, we have a very tight turnover and will be unable to accommodate a late check-out. Please ensure all members of your party know and abide by the check-out time.
Check-out for the weekend wedding package: 1:00 pm
Check-out for other events and stays: 11:00 am
Accidents and Damages
We know accidents can happen. Click HERE for our “What to do if…” section that includes information on broken items, damage, and biohazards.
Room Specific Information
Click on the room or area you’re in to find all information about temperature control, electronics, and more. Enjoy all we have to offer, but please don’t remove any indoor furniture or take it outside. Thanks!
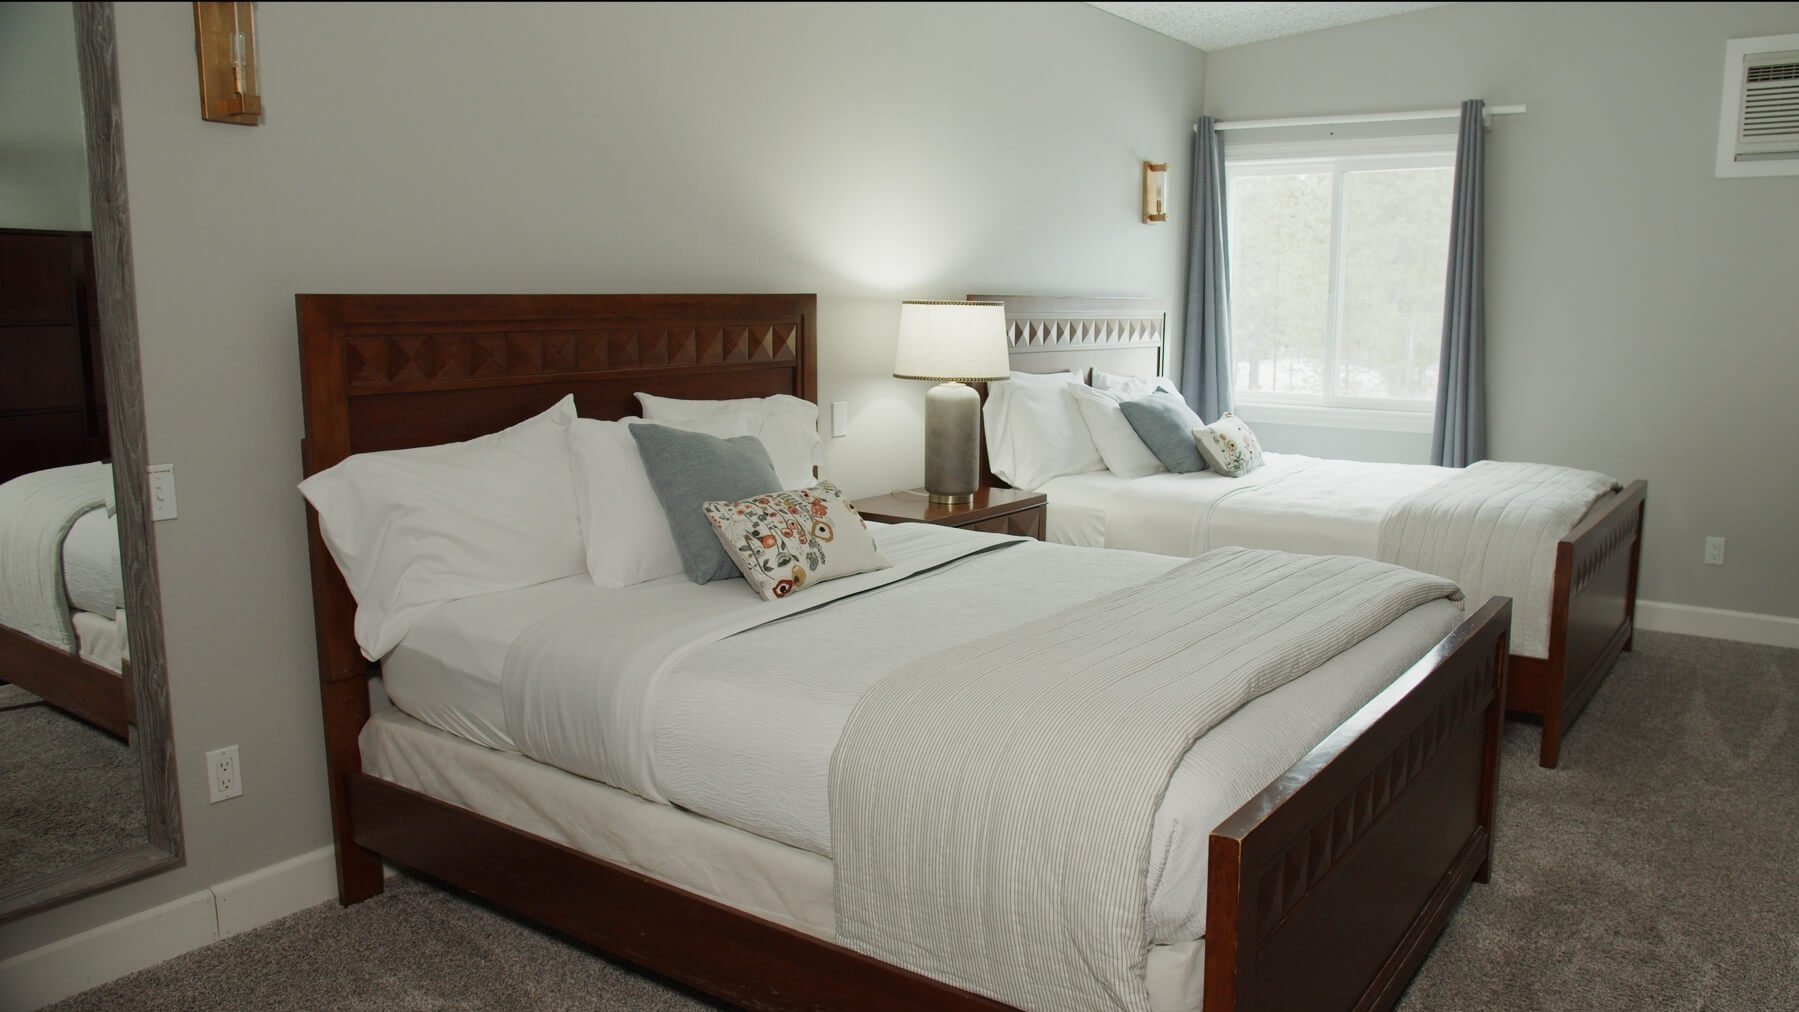
The Bridal Suite
Enjoy the ambiance of a fire while relaxing in your suite, listening to music or watching a movie!
Fireplace
Use the “light switch” to the left of the gas fireplace to turn on and off. Just be sure to turn it off when not in the room.
TV/Sound Bar
Use the Sony TV remote to turn on both the TV and Sound Bar (sound only comes through the sound bar). Once on, use the sound bar remote to control the volume of TV or to change the input to connect to Bluetooth to play music.
You can also use the manual buttons, if needed, on the top center of the sound bar. The left-most button is the power.
Ceiling Fan
The switch for the ceiling fan is located next to the entry door. It’s gray with 3 different speed buttons plus an on/off button.
Air Conditioning
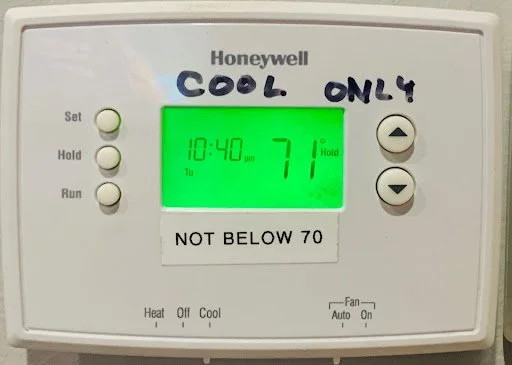
The Bridal Suite air conditioning temperature is regulated by the thermostat labeled ‘Cool Only’ in the Bridal Suite.
The current temp of the Bridal Suite will be displayed. (There will be a small triangle symbol above the word ROOM). To change the thermostat’s setting, press the Up/Down arrow.
The thermostat will temporarily display the SET (desired) temperature and a small triangle symbol will appear above the word SET.
Pressing + or - will change the set temperature. A snowflake symbol will appear over the temperature when the system is Cooling.
Please don’t set the temperature below 70 degrees.
In the SUMMER, the Mode switch should be set to COOL for air conditioning.
Heating
The Bridal Suite and the Bridal Suite Bath have their own heat thermostat. Both are labeled HEAT and will display the room’s current temperature. Press Up/Down arrows to change the set/desired temperature. The desired temperature will be briefly displayed. Be sure the bottom switch is set to HEAT.
The heating system is in the floor (radiant heat). It’s silent and takes a little bit of time to heat up, but once it does, it holds steady heat. So just a tip… don’t set it too high at first!
Please keep your windows closed when heating. The boiler heat system will use too much energy to heat your room with your window open, the other rooms in the building won’t get enough heat.
* The boiler heat system is turned off in the summer months. *
Additional Bath Heat
The Bridal Suite bathroom has another source of heat. The wall heater near the shower has a dial timer to quickly warm the bath area. (This heater is available all year round because it’s electric).
If you’re having problems with heating or air conditioning, please reach out to Chris: (208)691-7018.

Single Suite
Enjoy your own private suite — perfect for singles, couples, or even families with the cute, hidden murphy bed.
Murphey Bed
That cute gray dresser in the corner…yep it’s a hidden bed! Easy to use by just turning the lock on the side, flipping the top, and pulling down the bed.
Air Conditioning
The Single Suite air conditioning temperature is regulated by the thermostat in the upstairs hallway. The same thermostat also controls the Bunk Room Suite, Double Suite, and hallway. At the top, the thermostat displayed the desired temperature (70). Below the desired setting, it displays the room’s current temperature (74). Please do not set below 70 degrees.
It shows ‘Cool On,’ when it’s in Cooling mode and also ‘Fan Auto’, which means the fan is on when the system is cooling.
Please keep your window closed when cooling. The air conditioner will ‘freeze up’ and not work at all, needing hours to thaw out.

Heating
Each suite has its own thermostat for heat. It’s labeled HEAT for quick recognition and will display the room’s current temperature.
Press the Up/Down arrows to change the set/desired temperature. The desired temp will briefly be displayed. Be sure the bottom switch is set to HEAT.
The heating system is in the floor (radiant heat). It’s silent and takes a little bit of time to heat up, but once it does, it holds steady heat. So just a tip… don’t set it too high at first!
Please keep your window closed when heating. The boiler heat system will use too much energy to heat a room with an open window and the other rooms in the lodge won’t get enough heat.
*During the summer months, the boiler heat system is turned off.*
If you’re having any problems with heating or air conditioning, please reach out to Chris: (208)691-7018

Double Suite
The Double Suite is perfect for families or friends and comes complete with your own private bathroom.
Air Conditioning
The Double Suite air conditioning temperature is regulated by the thermostat in the upstairs hallway. The same thermostat also controls the Bunk Room Suite, Single Suite, and Hallway.
At the top, the thermostat displays the desired temperature (70). Below the desired setting, it displays the room’s current temperature (74). Please do not set below 70 degrees.
It shows ‘Cool On,’ when it’s in Cooling mode and also ‘Fan Auto’, which means the fan is on when the system is cooling.
Please keep your window closed when cooling. The air conditioner will ‘freeze up’ and not work at all, needing hours to thaw out.
Additionally, there is an In-Wall Air Conditioner you can adjust up/down or turn off. Because this suite is located above the commercial kitchen, it can be fairly warm and we want you to be comfortable.
A white Samsung remote will control the in-wall air conditioner’s functions and temperature setting.


Heating
Each suite has its own thermostat for heat. It’s labeled HEAT for quick recognition and will display the room’s current temperature.
Press the Up/Down arrows to change the set/desired temperature. The desired temp will briefly be displayed. Be sure the bottom switch is set to HEAT.
The heating system is in the floor (radiant heat). It’s silent and takes a little bit of time to heat up, but once it does, it holds steady heat. So just a tip… don’t set it too high at first!
Please keep your window closed when heating. The boiler heat system will use too much energy to heat a room with an open window and the other rooms in the lodge won’t get enough heat.
*During the summer months, the boiler heat system is turned off.*
If you’re having any problems with heating or cooling, please reach out to Chris: (208)691-7018

Bunk Room with Nanny Suite
The Bunk Room is a fantastic place for kids or young adults to sleep! Plus there is an attached suite if you have younger kids who need to have an adult nearby.
Air Conditioning
The Bunk Room and Nanny Suite air conditioning temperature are both regulated by the thermostat in the upstairs hallway. The same thermostat also controls the Single Suite, Double Suite, and hallway. At the top, the thermostat displayed the desired temperature (70). Below the desired setting, it displays the room’s current temperature (74). Please do not set below 70 degrees.
It shows ‘Cool On,’ when it’s in Cooling mode and also ‘Fan Auto’, which means the fan is on when the system is cooling.
Please keep your window closed when cooling. The air conditioner will ‘freeze up’ and not work at all, needing hours to thaw out.

Heating
Each suite has its own thermostat for heat. It’s labeled HEAT for quick recognition and will display the room’s current temperature.
Press the Up/Down arrows to change the set/desired temperature. The desired temp will briefly be displayed. Be sure the bottom switch is set to HEAT.
The heating system is in the floor (radiant heat). It’s silent and takes a little bit of time to heat up, but once it does, it holds steady heat. So just a tip… don’t set it too high at first!
Please keep your window closed when heating. The boiler heat system will use too much energy to heat a room with an open window and the other rooms in the lodge won’t get enough heat.
*During the summer months, the boiler heat system is turned off.*
If you’re having any problems with heating or cooling, please reach out to Chris: (208)691-7018

Cabin Suites
Each cabin suite has its own TV, thermostat, space heater, and air conditioning unit so you can enjoy your stay in comfort and privacy.
Air Conditioning
When using the air conditioning unit, located next to the fireplace, be sure to keep the outside door closed to keep the cabin cool.
Heat
The Living Room area, Bedroom, and Bathroom all have their own heater!
The Bedroom and Bathroom each have an in-wall heater. Use the temperature dial on the front to raise/lower the temp.
In Cabins 1 & 2, the Living Room thermostat is located on the wall near the headboard of the bed. When the thermostat calls for heat, it powers on the electric fireplace and also powers on a radiant heater.
In Cabin 3 the Living Room thermostat is located on the wall left of the fireplace. When the thermostat calls for heat, it powers on the electric fireplace.
If you’re having any problems with heating or air conditioning, please reach out to Chris: (208)691-7018
The Great Room
Watch TV/movies or listen to music while hanging out with friends and family! Also enjoy the heat and ambiance of the gas fireplace on cool nights!
Fireplace:
Enjoy the heat and ambiance of the fireplace by flipping ON the wall switch that’s just to the left of the fireplace. It puts out a lot of heat, so when you’re finished, please turn the fireplace off.
Air Conditioning:
The thermostat for the Great Room is at the bottom of the stairs. The switch at the bottom left should be set to Cool. The display will show the room’s current temp. Use the Up/Down arrows to change the temperature setting, but please do not set below 70 degrees.
Please keep all doors and windows cold when cooling. This will help keep the Great Room cool. With doors open, the air conditioner can ‘freeze up’ which then requires thawing out and no cool air for hours.
TV/Music System:
Each of the two TVs in the Great Room can play the same thing… OR they can each be playing something different at the same time.
The system looks complicated, but here are some easy steps to get it all working!
Do This First:
Use the white DirectTV remote to turn on all components. Check that the switch at the top of the remote is slid all the way to the left, point it at the TV above the fireplace (the Samsung) and press ON.
This should turn on all components.

If it doesn’t work correctly, use the steps below or give Chris a call.
Use this picture as a guide with the directions.

Step 1: Check that the Furman Power Conditioner is on. It’s in the top spot of the equipment rack. It should always remain ON. It basically powers everything! If it is powered off, DirectTV can take 5 mins to reacquire satellite & guide info when powering back on.
Step 2: Power on the Denon Stereo Receiver —it’s in the bottom spot of the equipment rack. The power button is on the bottom left corner and is green when on and red when off.
Step 3: Spin the Source Knob (large dial on the left front side of Denon) until AppleTV is shown on the Denon display. For this system to work properly, the Denon should remain on AppleTV input.
Step 4: Power on the DirectTV receiver, which is just above the Denon. It’s a touch screen, so no actual buttons. To turn on, touch the left face of DirectTV receiver. Blue lights will be displayed when power is on.
Last Step: Turn on one or both TVs!
Turn on the TV Above the Fireplace (the Samsung) with a power button located just behind the TV. When facing the TV, the button is on the right-hand side about 10” up and 4” in on the backside of the TV. This TV is always on input HDMI 1.
The TV at the Bar (the Sony) can be turned on with the black Sony TV Remote. This TV is always on input HDMI 2.
Here’s how to display what you want — even showing different things on the Tvs!
You’ll be using the HDMI Matrix located on top of the equipment rack.
Select which source (1-4) you’d like to view on the Fireplace TV (Output A) and the Bar TV (Output B). You do this by pressing the white button (A or B) until your desired source is lit up in green.
Here are the options for either output:
DirecTV
AppleTV
Chromecast
BluRay

Sound Tip: The surround sound speaker system plays the audio from the fireplace TV. The bar TV can use its own speakers. But it’s recommended that the Bar TV have no volume when both TVs are displaying the same thing.
AppleTV
From an Apple device (iPhone or iPad) you can Mirror Image your device onto the Fireplace or Bar TV. Share photos & videos, watch Netflix, YouTube, Hulu etc. It’s usually in sleep mode & must be woken up to use. Find the AppleTV remote and press Menu to “wake it up.”
Chromecast
Watch Netflix, YouTube, Hulu from the Cast-friendly app on your device
Just sign into the wifi on your device (ciderunifi with password - 51505150), open a cast-friendly app, and touch the Chromecast image.
Select ‘Lounge TV.’
Play the show/video/movie from your phone, and it will play on the Fireplace or Bar TV.
Netflix/YouTube or any streaming app
If you’d like to use Netflix, YouTube or other streaming apps, we recommend using AppleTV or Chromecast to use these Apps. This way, the sound will be played through the Stereo Speakers in 5.1 surround. The TV has its own apps, but sound will not play through the 5.1 surround sound speakers.
BluRay/DVD Player
Press the power button on the BluRay remote (or power on the BluRay player itself) to “wake it up” to use.
Contact Chris about any problems with air conditioning or stereo equipment/TV : (208) 691-7018.
The Theater Room
Gathering as family and friends is what Cider Mountain is all about and the Theatre Room brings everyone together to play games, watch movies, or just relax throughout the stay!
Here you have access to DirecTV, movies and a Blu-ray/DVD, AppleTV, and Chromecast—which lets you watch Netflix, YouTube, Hulu, etc. from the apps on your device—or connect any device you brought.
Use these instructions to enjoy a cinema-like experience!
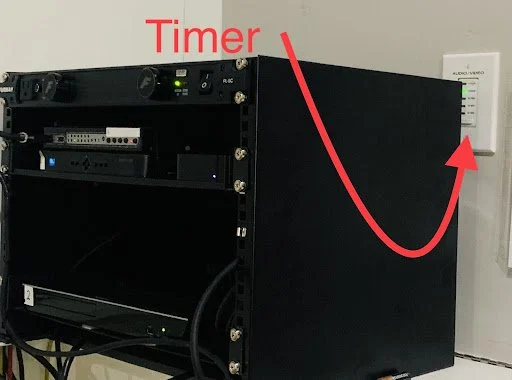
Step 1: Turn on Timer (located on the left side of movie screen on the wall) by pressing the bottom button. Each “press” selects a different length of time for the Theatre System to be powered on. The longest setting is 4 hours.
This timer powers on the speakers and sub and allows for the projector to be turned on. It also powers everything off when the time expires. So…it’s pretty important!
Step 2: Turn on Projector using the Blue Power button on the white Epson remote. Watch for a blue blinking light on the underside of the projector — this means the projector is warming up. When the blue light is solid and constantly on, the projector is ready to go.
Step 3: Select HDMI 2 Button on the white Epson remote.
Step 4: Make sure the Green light on the Furman power conditioner is on. It’s located in the equipment rack beside the timer — the power module is the top-most piece of equipment in the rack.
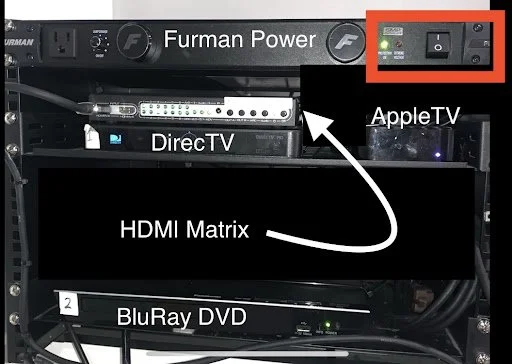
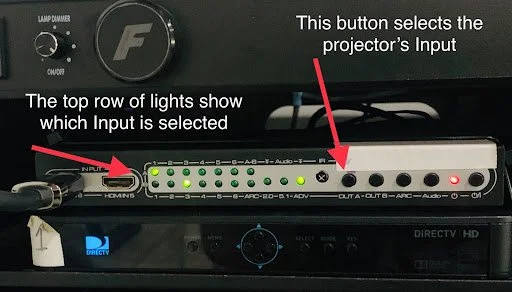
Step 5: Use the HDMI matrix to choose which device you’d like to view on the projector. The button “Out A” will allow you to select which input you’d like to view on the projector. The top row of green lights displays which input is selected. In the photo, Input 1 is selected. Here are the options:
HDMI 1: DirecTV
HDMI 2: Blu-ray/DVD
HDMI 3: AppleTV
HDMI 4: Chromecast (watch from the apps on your device)
HDMI 5: HDMI-connected Device (ie: laptop, XBox, etc)
AppleTV
Step 1: Select HDMI 3.
Step 2: From an Apple device (iPhone or iPad) you can ‘Mirror Image’ your device onto the theater screen to show photos, videos, watch Netflix, YouTube, Hulu etc.
Use the AppleTV remote and press ‘Menu’ to “wake it up” since it’s usually in sleep mode. There should be a small light on the front bottom of AppleTV when it’s powered on.
Chromecast
Use Chromecast to watch Netflix, YouTube, Hulu, HBOGo, WatchESPN or other apps. Here are the steps after you’ve selected HDMI 4 in the directions above.
Step 1: Turn the Wi-Fi on for your device (smart phone, iPad, etc.). Select ciderunifi for the network and login with password: 51505150
Step 2: Open your cast-enabled app and tap the Cast button. Select “Theater Chromecast” and choose a video to play. Now it will display on the projector!
HDMI Cable
The HDMI cable is coiled up and ready to go for you! Just plug it into your device once you’ve selected HDMI 5 in the directions above.
Sound/Volume Tip: Turn the volume up and down using the white Epson projector remote. Volume is displayed on the screen and ranges from 0 - 20. Volume level 5 is a good starting point.
Heating & Cooling
Air Conditioning
A thermostat at the bottom of the stairs in the Theater Room controls the air conditioning.
The Display will show the current time, day, and temperature in the room. If you press the Up/Down arrows, the display will briefly show the desired temperature. To change the desired temperature, press the Up/Down arrows to change the setting. Please do not set below 70. The switch on the bottom left of the thermostat should be selected to Cool.
Please keep windows and doors closed when cooling. The Air Conditioner will ‘freeze up’ and not work at all, needing hours to thaw out.

Heating
The Theater has its own heat thermostat. It’s labeled HEAT and will display the room’s current temperature. Press + or - to change the set/desired temperature. Press + to raise the temperature and - to lower it. Be sure the bottom switch is set to HEAT.
The heat is radiant heat in the floor. It’s silent and takes just a bit to heat up, but once it does it holds steady heat. So, don’t set it too high at first. The boiler heat system is turned off in the summer months.
Please keep windows and theater mud room doors closed when heating. The boiler heat system will use too much energy and the other rooms in the building won’t get enough heat.
If you’re having problems with cooling or heating, or audio/visual equipment, please reach out to Chris: (208)691-7018
The Porch
The screened-in porch has its own audio system that you can use during your event and can be heard out on the patio! Plus build a fire in the wood stove and gather together.
Wood Stove
The wood stove on the porch is available to use. There is firewood located behind the cupboard doors near the wood stove. There’s also firewood outside next to the stone fireplace on the patio.
The wood stove glass door must remain shut at all times. Please be careful and enjoy!
Stereo
Play any music through a Bluetooth device, USB, or even listen to the radio with this system.
Just like with the Great Room Audio, it seems a little complicated, but you will quickly be able to figure it out with the directions below.
Power up the Denon stereo, located in the corner near the wood stop, by using the top right red button on the Denon remote. You can also use the power button on the front bottom left of the stereo.
Now you have a few options to play music!
Option 1: Bluetooth
Step 1: To connect Bluetooth, push the “Quick Select 1” button on the bottom left of the Denon remote. This selects “Bluetooth” as the input source.
Step 2: Select “Option” on the remote — it’s just beside the volume control in the center of the remote—and select “Pairing Mode.”
Step 3: On your device, go to settings and turn on Bluetooth. Then select “Denon AVR-S700W” on your Bluetooth options. Select Pair.
Step 4: Using the remote, select “Pair” on the screen.
Once your device is paired, it will play through the Denon porch stereo.
Troubleshooting Bluetooth:
If your device won’t pair, make sure the last person to connect has disabled the Bluetooth on their device. This will allow for a new pairing. You also might try turning your Bluetooth off on your device. Then go back to Step 2.
When using Bluetooth, the device needs to stay close to the stereo. If it’s too far, the Bluetooth connection will be lost. If that happens, just start the steps over again.
Option 2: Pandora
Step 1: To connect to Pandora, push the “Quick Select 2” button on the bottom left of the Denon remote. This selects “Pandora” as the input source.
Step 2: The last selected station should play in the Denon. On the Insignia TV above the stereo, it should show Pandora selected, the Playlist selected, the Artist playing the song, and the song name. If you press the Down Arrow on the remote, it will play the next song on the playlist. You can pause the song if you’d like.
Step 3: You can press the Left Arrow on the remote and this will take you to all the Pandora stations created on this account. Then you can select a different station, or you can simply create your own Pandora station.
Option 3: FM Radio/Tuner
Step 1: To listen to radio, push the “Quick Select 3” button on the bottom left of the Denon remote. This selects “Tuner” as the input source.
Step 2: Then press Channel +/- on the remote to scroll through the station presets. On the Insignia TV, it should say TUNER and display the selected station.

Option 4: AUX (Plug in your own device using USB or 1/8” phone jack)
Step 1: Push the “Quick Select 4” button on the bottom row of the Denon remote. This selects “AUX” as the input source.
Step 2: Locate the cable hanging from the rear of the Denon receiver. It’s an 1/8” cable that can plug into your device’s headphone output. If your device needs a USB dongle to use wired earbuds/headphones, we have provided an Apple dongle (Lightning) and an Android dongle (USB-C). Both are attached together—just plug in the one you need.
Sound/Volume
The Sound Mode should be in Music Mode, Multi Ch Stereo. This allows the patio speakers—the pair facing the outdoor fireplace and the pair facing the exterior bar—to be playing.
The Volume Up/Down arrows on the Denon remote will control the stereo’s volume, as well as the largest dial on the right front of the Denon receiver.
Please contact Chris with any problems regarding the stereo equipment: (208)691-7018
The Groom’s Lounge
Listen to music or watch TV while getting ready for the ceremony!
Here are all directions you need to listen to music from your own device, a CD, or stream YouTube or Netflix:
Step 1: Power on equipment with the Orange Switch.
Make sure the Furman Power Conditioner (the top stereo component in the equipment rack below the Groom’s TV) is turned on. Use the far-right Orange Switch for power. It should be illuminated.
Step 2: Use Vizeo remote to turn on the TV (press the top-right button).
Step 3: Use Harmon Kardon remote to power on Audio Receiver (press the top-left button).
Now choose what you’d like to do!
To watch YouTube or Netflix use Chromecast:
The Vizeo TV Input should be on HDMI 4.
The Harmon Kardon stereo receiver should be on Video 1/Optical.
Speaker 1 should be turned on.
On your device, get on Cider Mountain’s Wi-Fi. Select ciderunifi as the network and use this password: 51505150
Go to a cast-friendly app on your device. Select the Chomecast symbol in your app and Choose ‘Groom’s Room TV’.
To listen to music from your device:
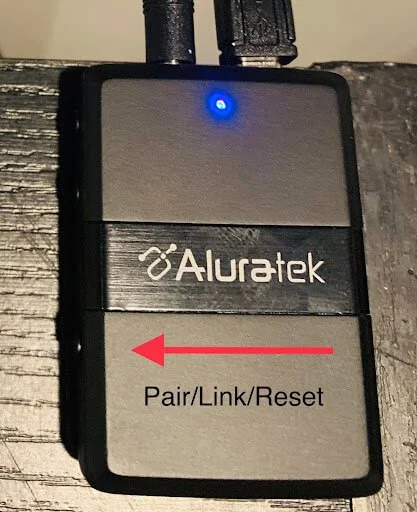
Select Video 2 on Harmon Kardon stereo receiver.
On your device, turn on your Bluetooth and look for ‘ABC01F’ in your Bluetooth list.
If you don’t see it, make sure the Bluetooth receiver is powered on. The Bluetooth receiver is located on the top rear right of the stereo component equipment rack. It should have a red or blue light on the top. To prompt the Bluetooth device to Pair with your device, press the button shown in the picture:
To listen to music from a CD:
The Harmon Kardon stereo receiver should be on Input.
Load a CD into the CD player (purple component in stereo rack, HHB)
If you’re having any problems the TV or Stereo, please reach out to Chris: (208)691-7018
The Laundry Room
Get some laundry done conveniently in the downstairs laundry room with our easy-to-use washers and dryers.
Washing Machine
Step 1: Press the Power Button. This will light up the selection ring and settings.
Step 2: Choose the setting you’d like by turning the knob in the middle. For most washes, you’ll turn the knob to “Normal” or “Delicates.” Check the settings on the right-hand side to ensure they’re what you’d like.
Step 3: Hold the START button for a few seconds until the water begins (Looks like a play/pause button).
Step 4: Add soap. We’ve provided some for your stay.
Step 5: Add clothes! (Tip: For the washer without an agitator, the trick is to put clothes in a donut shape as if it does. Leave the center empty for the best wash.)
Dryer
Be sure to check the lint tray to ensure faster dry times! Then, after placing clothes in dryer, follow these steps:
Step 1: Press the Power Button. This will light up the selection ring and settings.
Step 2: Choose the setting you’d like by turning the knob. For most loads, you’ll turn the knob to “Normal” or “Delicates.” Check the settings on the right-hand side to ensure they’re what you’d like.
Step 3: Press the START button to begin dryer. Press PAUSE to be able to open dryer and check clothes (and then start again to continue drying). Press CANCEL when you are finished drying clothes and are ready to take them out.
Kitchen: Appliances, Info, & Tips
-
General Kitchen Information
The commercial kitchen is fully equipped with a variety of cooking equipment and appliances to make cooking during your stay enjoyable!
It is normal for the kitchen to get very warm with a large double fridge, large freezer, 9 gas pilot lights, and a high temperature dishwasher. We just want to give you a heads up so you can plan accordingly.
In this section, you’ll find important information and tips when using the kitchen.
-
Hood Fan
The hood fan over the stove area brings in outside air. This is important to know if you’re trying to cool down the kitchen.
Whenever the hood fan is running, it’s replacing the air with outside air — whether that air is 30 degrees or 100 degrees outside. So, on hot days It doesn’t really cool down the kitchen.
To switch ON the hood fan, swing open the door beside the stove. The first switch will be the hood fan. The second switch turns on the hood fan lights.
-
Air Conditioning
There is an air conditioning system for the kitchen and it works best if all kitchen doors are closed and the hood fan is off.
The thermostat is located beside the baker’s rack that holds the plates and bowls. The first switch should be set to COOL. The second switch should be set to AUTO. The kitchen’s temperature will be displayed and you can use the + or - buttons to adjust.
Please don’t set below 72 degrees. Thanks!
-
Stove, Range, & Griddle
There is so much cooking and baking space in the kitchen! We have:
4 large stove tops/burners on the range
24” wide griddle top
24” broiler rack just below the griddle top.
Turn on the hood fan when using any of these.
Pilot Lights
There are 9 pilot lights that should always be on and running — 4 burners, 3 under grill, and 1 below each gas oven. You may see a little blue flame. This is normal and is the pilot light.
-
Ovens
There are 4 ovens for you to use.
The two electric convection ovens are stacked together next to the range and the two gas ovens are under the griddle and burners
Oven Tips
The electric convection ovens are best for most baking or roasting. Convection ovens will cook faster and hotter, so turn the temp down 25 degrees lower than you would in a regular oven. And check your food often! The doors feel very hard to open and close, but that is normal.
-
Coffee Bar
Ready for some espresso?
You’ll find an espresso machine just outside the kitchen area along with an ice machine and easy-access cooler.
Click HERE for the Quick Start Guide of the Breville Espresso Machine. Brew espresso or your favorite drink.
Want tips for the best coffee extraction? Click HERE for that!
-
Hand-Washing & Food Prep Sinks
Hand-Washing Sink: This sink is on the wall next to the pantry and is for hand washing only.
Food Prep Sink: This sink is located on the kitchen island. It is for cleaning and washing food. It should always have a screen in the bottom of the sink. There is no garbage disposal, so please throw away debris from this screen to prevent it from washing down the sink.
-
Dishwashing Sink
This sink is located next to the dishwasher of course!
It doesn’t have a garbage disposal so It’s very important to have the strainers in the bottom of both sinks and to scrape off food into the trash BEFORE rinsing them off into the sink.
There is a trash can conveniently located under the sink for exactly this reason — to clean off plates and sink screens.
Then, to use the handsprayer, just grab it and pull the trigger. To fill pots, turn on the valve above the faucet.
We keep the HOT on the facet all the way on and the COLD on the facet all the way off since it’s much faster and easier to clean off the dishes.

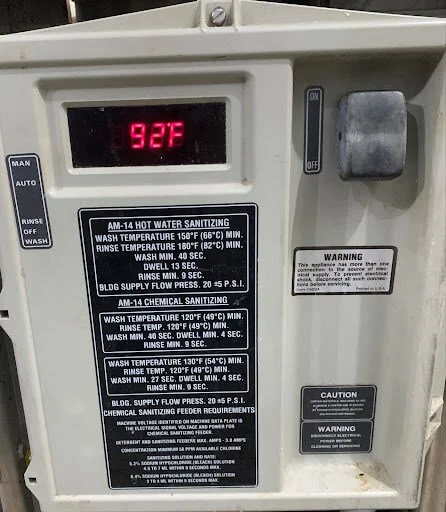
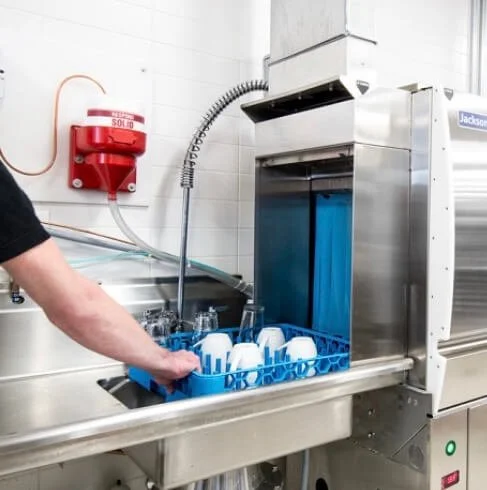
The High-Temperature Sanitizing Dishwasher
This dishwasher will make cleaning up quick and easy! Just follow these steps!
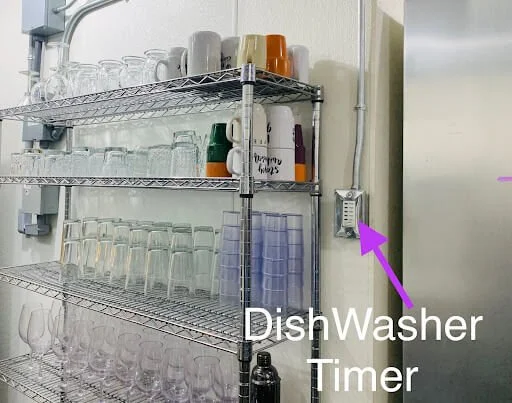
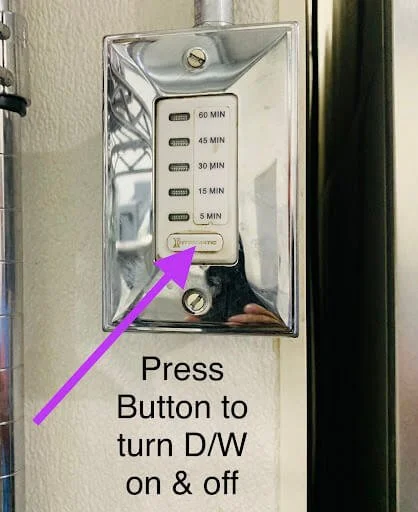
First, Power on the Dishwasher. The button is located behind you when you’re looking at the sink (the opposite wall of the dishwasher). If you’re doing several loads, set this timer for 60 minutes so you have power provided the entire time.
Next, let the dishwasher heat up for about 10 minutes. Because it’s a sanitizing washer, it must reach optimal temp to do its job. It should be 150 degrees or higher before starting your dishwashing session.
Before Loading, make sure debris/strainer baskets are in both sides of dishwashing sinks, and also scrap food and sauce from plates and bowls into the trash. (See additional information about the dishwashing sink above if needed)


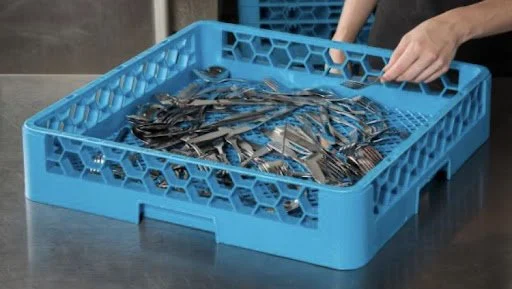
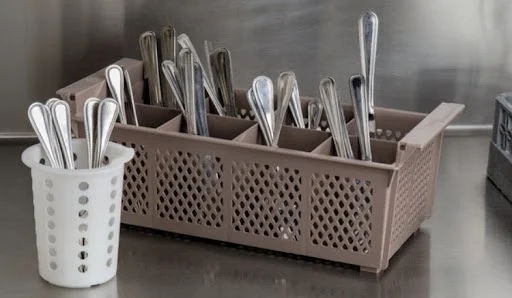
For Silverware, use the stainless rectangular container. Add a little dish soap and bleach and fill it 2/3 up with water. Place all silverware in this to degrease and loosen up any food on the silverware.

These are important steps because the dishwasher is really a dish sanitizer. If the dishes go in dirty, they’ll probably come out dirty…. Yuck!
So please rinse everything and scrub any hard stuff off because the 2-minute cycle will clean and sanitize but not remove excess or stuck-on food.
Finally, load the rack, slide it in, and close the dishwasher door!
Once the temp has reached 150 degrees, open the left side door and slide rack into the dishwasher. To reduce water, energy & dishwasher chemicals, please load up racks full before running through.
When you close the dishwasher door, the washing and sanitizing process will begin. It will display WASH and temp when washing. Next, it will display RINSE and temp. Detergent and rinse aid are automatically added so you don’t need to worry about those.
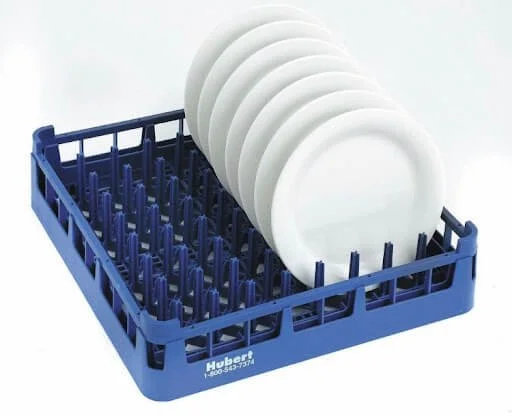
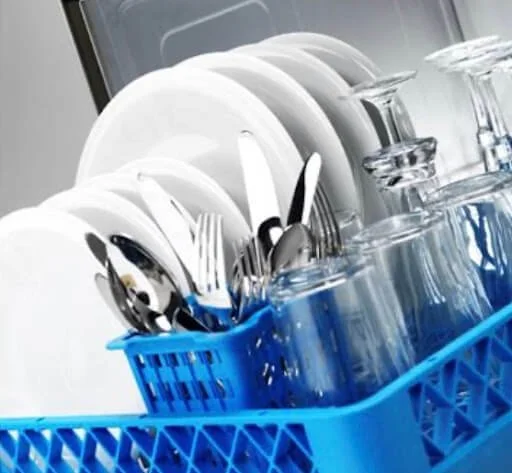
Here are some Rack-Loading Tips:
Rack plates and bowls together on Plate Racks.
Silverware/Serving Utensils can be laid out flat or placed into Flatware Racks.
Glasses can be placed upside down on Plate Racks or on Glass Racks.
Wine glasses can be racked on Wine Glass Racks
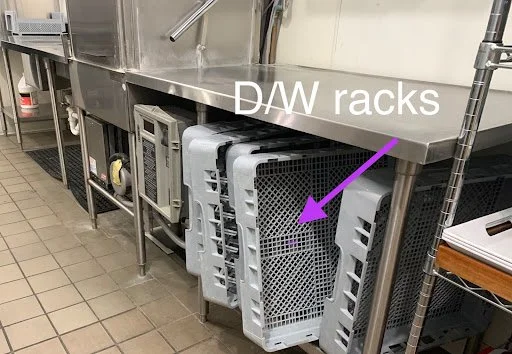
When wash is complete, open side door and slide rack out to the right side. Let the dishes/glassware/flatware air dry. There is enough room for 2 racks to dry on the countertop to the right side of the dishwasher. When dry, please place items, as well as racks, back to where they are stored.
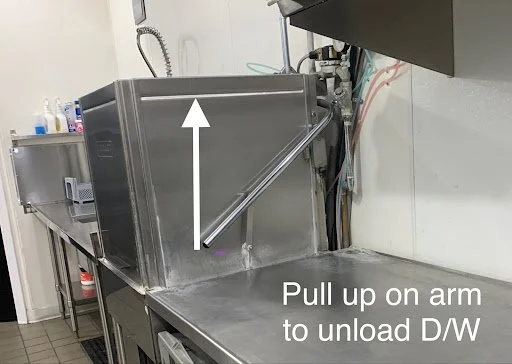

If you’re done dishwashing for a bit, raise the side door and turn off the power to the dishwasher with the timer on the wall opposite the machine.
Last steps when Done-Done dishwashing for the day:
First, with the power off, raise the right side door of the dishwasher and reach into the dishwasher gently pulling drain lever up—this will drain the water out.
Second, there is a handle at the bottom of the dishwasher that sticks up. Pull the handle up to remove the debris basket and empty it into the trash. Place it back into the dishwasher.
Leave door up and you’re all done!
Troubleshooting
If the dishwasher doesn’t seem to be operating properly, a switch might have accidentally tripped. The red rectangles in the picture show the position that 3 switches on the dishwasher must be in.
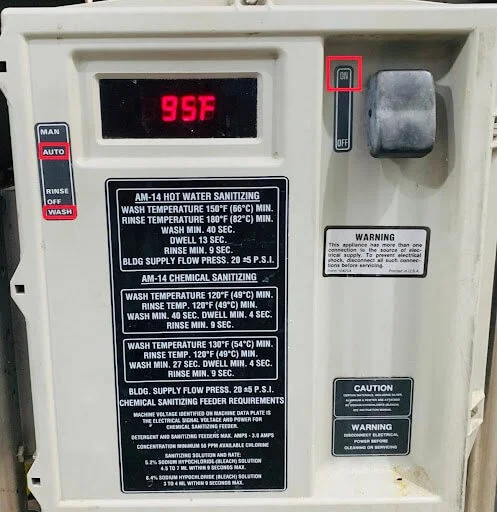
If that doesn’t work or you have any issues with the dishwasher or other kitchen equipment, please call Corrie: (208)691-7111
All Things Outdoors
-
Fireplace
Firewood, kindling and newspaper are available in the brick cubbies beside the fireplace.
More firewood is available behind the Restroom Trailer as well. There should be a wheel barrow beside the firewood supply so you can easily bring over a large amount of firewood.
-
Exterior Bar
The patio bar has many uses! Drinks, of course, but it can also be used for displaying gifts or photos, or serving desserts or hors d’oeuvres.
The hanging lights over the bar can be turned on with the switch located on the post of the pergola.
-
Propane Heaters
Elegant outside propane heaters are available upon request!
Contact Chelsea for set-up: (208)561-1101
-
Outdoor Yard Games
Have fun with outdoor yard games! A variety of games are located in and around the Cedar shed. They include Pickleball, 4-Square volleyball, Cornhole, and Frisbee golf nets.
-
DJ/Stage Area
The stage area lights are turned on and off with the extension cord beneath the stage next to the stair.
The power for the DJ or band is a yellow extension cord on the stairs-side of the stage. The cord can reach the center of the stage if needed. The DJ or band needs to power off PA no later than 10:30 pm.
-
Dance Floor
Light up the dance floor with more than just your moves! The lights above the dance floor are turned on and off by the power cord on the huge tree beside the dance floor.
-
Lights, Lights, and More Lights
Patio & Cabin Pathway Hanging Lights:
These lights automatically turn on at dusk and turn off at sunrise. But there is a dimmer for you to use.
Yard Lights:
The yard lights also turn on at dusk and off at sunset. To turn off a specific yard light, there’s a switch on the tree below the light.
-
Event Restrooms
We’ve built full restrooms for your guests to use during your event. The restroom “trailer” is located behind the stage and is unlocked for events. They are handicap-accessible and air-conditioned for comfort.
-
BBQ
There are a few options for BBQing:
—Blackstone 36” Gas Griddle Cooking Station: 4 Burner Flat Top Iron Grill
—Briquette or Wood Fired Grill: Smoker Shaped
—Big Green Egg: Ceramic Briquette-Fired Grill/Smoker
—Traditional style Gas BBQ
Grilling/Cooking tools and utensils specific to the grill are located in the kitchen pantry.
-
Parking Areas
We have 3 areas for plenty of parking!
Front Parking Area:
The closest parking area is just in front of the lodge. There are approximately 50 marked parking spaces and the area is lit with yard lights.
Additional Close Parking Area:
This area holds approximately 15 cars and its very close to the lodge. It can also hold authorized RV’s and campers that don’t require hookups. This parking area also has a yard light.
Field Parking Area:
On the day of your ceremony, the field parking lot can be used. It can easily hold 100+ vehicles and often a generator will be running at night until 11 pm (or earlier if the cars have already left) to illuminate the area and the road leading to the field parking area.
-
Lawn Sprinklers
Lawn sprinklers are programmed to come on around 2 am. Please do not leave anything on the lawn that will get damaged by the sprinklers.
We also request that you don’t leave items on the lawn for more than a day. It’s very sensitive and will get discolored or burned when items remain on the grass.
In very hot weather (90s or above), we’ll need to run the sprinklers for a 2nd shift during the day. We’ll communicate that time with you after discussing what activities you have going on.
*On days of events, the sprinklers will be turned off. We can leave everything set up (tables, chairs, tent, etc…) the evening before because the sprinkles will turn off by 4 pm.
-
RV & Food Truck Vendor Hookups
Cider Mountain has 3 RV spots with electrical hook-ups available, although there are no sewer or septic hook-ups.
A Food Truck Vendor would be using one of these spots.
RV Spot 1:
Located to the west side of the Theater Room entrance of the lodge, this spot has a 30-amp Electrical Hookup available on the wall. The water hook-up is in the corner of the planter next to the spot.
RV Spots 2 & 3
Two RV spots are located next to the cedar shed. RV Spot 2 is great if you have a vendor coming! If not, then use it for a personal RV. This spot has a 30-amp electrical hookup available on the shed wall.
If you have both a vendor and an RV, an additional 20-amp plug at RV Spot 3 can be provided.
There is water hookup in the Tool Shed and we can run a hose under the roll-up door. We also have cable/hose protection ramps to run services.
What To Do If…
Break something? Kids have an accident? Did you get sick?
Life happens even on vacation or during the most perfect weekend wedding. But please let us know! We want to make it easy for you — and for us — to get it cleaned up or fixed.
…You Break Something (games, lamp, chair, etc.)
We want all our guests to enjoy their time here and we also understand that things happen.
Here are 2 simple, quick, and reasonable solutions to handle a replacement when accidents happen:
Buy an identical item on Amazon/Online. Let Corrie know through text that you’re taking care of it and ship it to:
Cider Mountain
1568 Cider Rd.
Athol, ID 83801If you can’t find an identical replacement or it’s not in stock, contact Corrie to talk about how to proceed. We can talk about a similar item or reimbursement. Including a photo of the damaged item with your text is helpful for determining options.
Thank you for keeping us updated. (We know it can be a little embarrassing and appreciate the transparency when it happens!)
Text or call Corrie at (208)691-7111.
…Damages Happen That Require Repair (to a wall, sink, etc.)
Please let us know right away if an accident causes damage to the venue. Here’s what to do:
Take a picture of the damage and text it to Jimmy. He’s our fantastic handyman and will schedule a repair.
Letting us know quickly helps minimize damage and gather materials. Then we can have things fixed for you and ready for the next guest too!
Jimmy can be reached at (208)561-1100.
…There’s an Accident Involving a Biohazard (urine, blood, vomit, etc.)
Please follow this protocol when accidents involving urine, blood, vomit, or feces occur.
Under the sink in all bathrooms is a plastic-lined bin with a cleaning kit. It includes absorbent material and disinfectant. Use this to clean the area thoroughly. Additional cleaning rags can be found in the laundry room.
Any towels, linens, or washcloths that have been contaminated need to be disposed of in a trash bag and put in the dumpster. You will NOT be charged for the damaged linens — we don’t want them thrown in with the regular wash contaminating all other linens.
Contact Corrie by text or phone and include:
List of materials disposed of and a request for replacements if needed.
Details about any staining that occurred and/or additional things that housekeeping may need to address.
Description of where the accident occurred.
Cider Mountain does not clean biohazards; this is the guest’s personal responsibility. Please do not leave a biohazard clean-up for housekeeping to find after checkout.
Guests will be billed $250/hr for special cleaning services if the biohazard protocol above is not followed.
Contact Corrie at (208)691-7111.
…Something Needs Maintenance (leaky faucet, burned-out bulb, etc.)
We work hard to ensure things are in great working order for our guests. If we’ve overlooked an item that needs maintenance, please contact us so we can get it fixed for you right away!